Through Influenster and L'Oreal Paris I received a L'Oreal Advanced Hair Care Extraordinary Oil VoxBox!
The products included were:
L'Oreal Advanced Hair Care Extraordinary Oil Nourishing Shampoo
L'Oreal Advanced Hair Care Extraordinary Oil Nourishing Conditioner
L'Oreal Advanced Hair Care Extraordinary Oil Lustrous Oil Serum
I was super excited to review these products given to me by L'Oreal Paris! My hair is processed, frizzy, thick, and dry. I had high hopes that these three products would do wonders for my hair.
After using all three products for 1 week straight my hair became noticeably shinier, less frizzy, and healthy all around. The shampoo and conditioner I use daily. The leave in oil serum I use every other day.
These products worked wonders for my hair and I highly recommend people to try these products out! Especially for people with dry, damaged, and frizzy hair.
If you want to learn more information about these products or order some for yourself you can find them on the L'Oreal Paris website. The shampoo and conditioner are $4.99 and the oil serum is $6.99. Each product is definitely worth every penny!
Hopefully, if you hair fits into the category where these products will help you, you will try them out and be as amazing with these products as I am!
Monday, March 7, 2016

Monday, February 1, 2016
Influenster Jingle VoxBox!

I have previously received voxboxes from Influenster and all the products I have received in the past were amazing!! I could not wait to open my #JingleVoxBox and try out all the products!!
Lets jump into the reviews!
The first product I tried were the Biscoff Cookies. I ate these cookies with a nice cup of hot tea every morning. It was a great way to start my day! I even enjoyed eating them alone. They taste almost like a graham cracker but better!
A Biscoff Family Pack, which includes 320 cookies, is only $32.95! If you want to pick up a pack to try yourself you can order it from the Biscoff Cookie Website!
The next product I tried were the Ore-Ida Tater Tots. These tater tots are so delicious and perfect for any super bowl sunday party! I tried a recipe which turned the Ore-Ida tater tots into a Mexican Taco dish! It was so delicious and filled my craving for tacos even though I didn't actually eat tacos!
A bag of Ore-Ida Tater Tots cost $5.95 depending on your supermarket. If you want to try a bag for yourself you could purchase some from the Ore-Ida Website!
Another product I received was a Pure Ice Nail Polish. I love changing my nail color often so once I saw a new nail polish in my jingle voxbox I had to try it on right away! The pigment is very opaque and the lasting power is great. I did not have to re-paint my nail until almost 2 weeks after the first application.
One Pure Ice Nail Polish costs $2.07- can you say affordable!?!? If you want to try a new nail polish color for yourself you could purchase one from the Pure Ice Nail Polish Website!
The next product is the Cetaphil Moisturizing Cream. I was a little skeptical because I did not want this product to break me out but I was pleasantly surprised! This moisturizer is very gentle on your skin and definitely keeps your skin hydrated during these cold winter months!! Also, the cream has no fragrance.
A jar of Cetaphil Moisturizing Cream costs around $12. You could order this product online through the Cetaphil Website or pick it up at Walmart, Ulta, Kmart, Walgreens, CVS, or Target!
I also tried Kiss Eyelashes and Eyelash Glue. I never liked to apply false lashes because they would never stay. I would always have one eyelash peeling off and then end up looking like a moron. I decided to give these lashes a shot with the Kiss Eyelash Glue. To my surprise, I went the whole night without even noticing I had false eyelashes on!! They felt so natural and they did not peel off at all!! I must have been using all the wrong products!
A pair of Kiss Eyelashes are $3.99 and a bottle of Kiss Eyelash Glue costs $2.99. You could pick up a pair of lashes and eyelash glue online through the Kiss website!
The next product, or should I say stuffed animal, I received was an Olaf Itty Bitty! This toy was such a cute surprise! I absolutely love the movie Frozen and Olaf happens to be my favorite character. I definitely would recommend getting an Itty Bitty for anyone! There are so many characters available and the plush is miniature enough to keep in your room for a subtle touch of adorableness!
An Itty Bitty costs $6.95. You could pick up one, or a few, at a Hallmark store or purchase it from the Hallmark website!
The last item I tried was the NYC New York Color City Proof 24HR Eyeliner in the color Black. I received a NYC New York Color City Proof 24HR Eye Shadow in a previous voxbox. I highly recommended that product so I had high expectations for this eyeliner! The NYC New York Color City Proof 24HR Eyeliner also passed my 24HR test! It stayed on me without a smudge for over 24 hours! I expected nothing less since the NYC New York Color City Proof 24HR Eye Shadow worked so well! I really recommend this product and it is extremely affordable!
One NYC New York Color City Proof 24HR Eyeliner costs $3.57. You could purchase this at Walmart, CVS, Target, Duane Reade, or on the New York Color website!
Overall the Influenster Jingle VoxBox was an amazing box! I loved every product and I hope you get to try all the products in this box as well. They are definitely worth trying out!
If you want to become an Influenster you can sign up for free through the Influenster website!
Monday, December 14, 2015
DIY: Long Distance Mug!
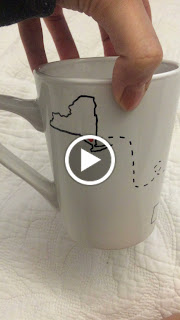
Here are step by step instructions on how to create this adorable mug for a long distance best friend! You can always change around the wording if you are in a long distance relationship!

 Step 1) Purchase supplies
-1 White Mug (I bought mine at the dollar store)
-Paint Pens in any color needed (available at craft stores)
-Scissor
-Tape
-Pencil

Step 2) Print out the outline of both states you are including on the mug.
Make sure you tape the states on the mug to test out the size before you start tracing.
Step 3) Shade in the entire back of the state (side of paper that is white) with pencil.
This step allows for the pencil to be transferred onto the mug when you trace the state.
Step 4) Tape the picture of the state onto your mug. Trace the state with your pencil.
Peel off when you are done fully tracing the state.

 Step 5) With your paint pen, draw over the pencil transfer marks.
Be careful not to touch the paint- let dry for 30 mintues
Step 6) Repeat for second state
Step 7) With pencil, draw dashed lines connecting both states to the cities you each are located in.
Step 8) Draw over the pencil dashed lines with your paint pen.
Add tiny red hearts, with paint pen, locating the cities you both are located in each state.
Allow that side of the mug to dry for 30 minutes before holding the mug.
Step 9) Once the front side of the mug is dry, turn the mug to the back side.
Trace any quote you want to put on the mug out in pencil.
Step 10) Go over the quote written in pencil with your paint pen.
Step 11) Allow the entire mug to dry over night.
Step 12) Put mug into oven at 425 Degrees for 30 minutes.
Heating the mug makes the paint solidify into the mug.
Place mug into cold oven while heating up so the mug acclimates with the temperature
slowly and does not crack.
When the 30 minutes are up, leave the mug in the oven while the oven cools down.
These steps are precautionary so the mug does not crack.

Now you're all finished!! You have just made a thoughtful and extremely cute gift for a long distance friend or long distance boyfriend/girlfriend!!
 xoxo,
xoxo,
Christiana


-1 White Mug (I bought mine at the dollar store)
-Paint Pens in any color needed (available at craft stores)
-Scissor
-Tape
-Pencil

Step 2) Print out the outline of both states you are including on the mug.
Make sure you tape the states on the mug to test out the size before you start tracing.
Step 3) Shade in the entire back of the state (side of paper that is white) with pencil.
This step allows for the pencil to be transferred onto the mug when you trace the state.
Step 4) Tape the picture of the state onto your mug. Trace the state with your pencil.
Peel off when you are done fully tracing the state.


Be careful not to touch the paint- let dry for 30 mintues
Step 6) Repeat for second state
Step 7) With pencil, draw dashed lines connecting both states to the cities you each are located in.
Step 8) Draw over the pencil dashed lines with your paint pen.
Add tiny red hearts, with paint pen, locating the cities you both are located in each state.
Allow that side of the mug to dry for 30 minutes before holding the mug.
Step 9) Once the front side of the mug is dry, turn the mug to the back side.
Trace any quote you want to put on the mug out in pencil.
Step 10) Go over the quote written in pencil with your paint pen.
Step 11) Allow the entire mug to dry over night.
Step 12) Put mug into oven at 425 Degrees for 30 minutes.
Heating the mug makes the paint solidify into the mug.
Place mug into cold oven while heating up so the mug acclimates with the temperature
slowly and does not crack.
When the 30 minutes are up, leave the mug in the oven while the oven cools down.
These steps are precautionary so the mug does not crack.

Now you're all finished!! You have just made a thoughtful and extremely cute gift for a long distance friend or long distance boyfriend/girlfriend!!
Christiana
DIY: Christmas Care Box!
This Christmas I decided to send a Christmas Care Box, filled with goodies, to my best friend who is in the Air Force.
Here are step by step directions on how to decorate the inside of a plain mailing box!
Step 1) Pick up a free box from the post office
OR
Purchase the appropriate size box to fit all your presents
I had to purchase the box I used since the gifts I was sending did not fit in the free boxes from the post office. Make sure you measure the largest item you are sending before you go to the store to purchase your box. The store employee will want to know the dimension of the box you want. Knowing the size of the largest item you will be sending will make it much easier to find a box.
Step 2) Pick up craft supplies
-Scissors
-Tape
-Glue
-Black Sharpie or Colored Markers
-Decorative Paper
-Stickers, Glitter, Festive Items
-Any craft item that you think will enhance the look of your box
Step 3) Print out any pictures that you would like to add on your box. Cut them out.
Step 4) Measure decorative paper to the size of the sides of your box. Cut paper to size and tape.
Any cardboard area which is shown inside your box will be covered with decorative paper.
Make sure the paper is securely taped down. You do not want any of the paper to peel off
during the mailing process of your care box.
 I decorated my box with red and green paper. Alternating the colors.
Step 5) Write any message on the tabs of your box with a sharpie or colored markers.
Decorate with festive decorations! (I used a little snow man and foil from Holiday
Hershey Kisses. I made them into little snowflakes and presents)
Make sure you tape/glue down all decorations securely!
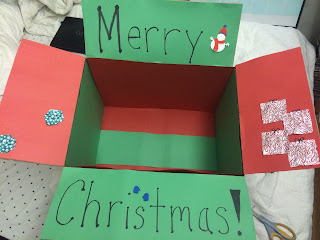
Step 6) Glue on pictures to the tabs of your box and sign your name.

Step 7) Fill box with gifts and goodies!

Now you're all done!!!! You have made a very festive and thoughtful care box! It is very simple and is a lot of fun to put together! There are many creative quotes to write inside care boxes if you are in a long distance relationship. If you can't come up with a personal/unique quote then I recommend looking up care boxes on pinterest or google!
xoxo,
Christiana
Here are step by step directions on how to decorate the inside of a plain mailing box!
Step 1) Pick up a free box from the post office
OR
Purchase the appropriate size box to fit all your presents
I had to purchase the box I used since the gifts I was sending did not fit in the free boxes from the post office. Make sure you measure the largest item you are sending before you go to the store to purchase your box. The store employee will want to know the dimension of the box you want. Knowing the size of the largest item you will be sending will make it much easier to find a box.
Step 2) Pick up craft supplies
-Scissors
-Tape
-Glue
-Black Sharpie or Colored Markers
-Decorative Paper
-Stickers, Glitter, Festive Items
-Any craft item that you think will enhance the look of your box
Step 3) Print out any pictures that you would like to add on your box. Cut them out.
Step 4) Measure decorative paper to the size of the sides of your box. Cut paper to size and tape.
Any cardboard area which is shown inside your box will be covered with decorative paper.
Make sure the paper is securely taped down. You do not want any of the paper to peel off
during the mailing process of your care box.

Step 5) Write any message on the tabs of your box with a sharpie or colored markers.
Decorate with festive decorations! (I used a little snow man and foil from Holiday
Hershey Kisses. I made them into little snowflakes and presents)
Make sure you tape/glue down all decorations securely!

Step 6) Glue on pictures to the tabs of your box and sign your name.

Step 7) Fill box with gifts and goodies!

Now you're all done!!!! You have made a very festive and thoughtful care box! It is very simple and is a lot of fun to put together! There are many creative quotes to write inside care boxes if you are in a long distance relationship. If you can't come up with a personal/unique quote then I recommend looking up care boxes on pinterest or google!
xoxo,
Christiana
Sunday, December 13, 2015
DIY: Open When... Envelopes!
This Christmas I decided to send a Christmas Care Box to my best friend in the Air Force. Within the care box I included a few "Open When....." envelopes.
Here are some "Open When..." envelope ideas, as well as what to put inside.

Include an envelope which states "Open When.... You Get This Package!"
In this envelope I included:
-A note saying "Merry Christmas", hopes he enjoys his gifts, and how the envelopes work

1) Open When..... You Feel Sick
In this envelope I included:
-Cough Drops
-Tea Packets
-Tissues
-A note saying "Cold Care Kit", what is inside, and to feel better quickly since our
country is depending on him! (He's an airman in the U.S. Air Force)

2) Open When..... You Can't Sleep
In this envelope I included:
-Sleepy Time Tea Packets
-A note saying "Can't Sleep?" and some instructions on what to do.
ex: drink sleepy time tea, count sheep, call me and I'll sing some lullabies

3) Open When.... You Need A Good Laugh
In this envelope I included:
-Silly Pictures of us and friends
-A note which includes extremely corny jokes that will immediately make
anyone laugh due to the stupidity of them.

4) Open When.... You Need A Hug
In this envelope I included:
-A Mailable Hug
DIY: -Trace both hands on construction paper and cut out.
-Measure yarn the length of arm span.
-Connect hands with yarn.
-A note explaining how I made my mailable hug.

5) Open When.... You Are Stressed
In this envelope I included:
-Tazo Focus Tea Packets
-Bubble Wrap
-A note saying "For immediate stress relief, pop bubbles as needed".
As well as an inspirational/motivating sentence.

6) Open When.... You Are Homesick
In this envelope I included:
-CD filled with a bunch of their favorite songs
-A homemade video
DIY: -Film family and friends saying they miss them and hope to see them soon
-Film favorite places, driving to their house, walking up to the front door
(All filmed in the viewers perspective)
-Edit with their favorite songs and funny bloopers
-Create a private YouTube account and upload video
-A note with step by step instructions on how to access the YouTube channel
Write the Username & Password to the YouTube account so they can access
the video as many times as needed when they feel homesick.

7) Open When.... You Need To Hear A Few Compliments
In this envelope I included:
-Take A Compliment rip off sheet
This sheet has compliments written on the bottom, cut & ready for the person to take.
-A note stating some of your favorite qualities in that person

8) Open When.... You Are Horny (If you happen to be a little more than friends with this person)
In this envelope I included:
-Lube
-Risque Pictures
DIY: 1)Print pictures out and put inside envelope
OR
2)Create a private online photo account (can be updated from time to time)
-A note saying a risque message. As well as, the username & password to the online photo
account. (For the recipients eyes only)

These are ideas for "Just Friends- Open When...." Envelopes. There are many more ideas for "Couple- Open When...." Envelopes.
Hopefully some of these ideas inspired you or helped you figure out what to put inside some of your envelopes!!
xoxo,
Christiana
Here are some "Open When..." envelope ideas, as well as what to put inside.

Include an envelope which states "Open When.... You Get This Package!"
In this envelope I included:
-A note saying "Merry Christmas", hopes he enjoys his gifts, and how the envelopes work

1) Open When..... You Feel Sick
In this envelope I included:
-Cough Drops
-Tea Packets
-Tissues
-A note saying "Cold Care Kit", what is inside, and to feel better quickly since our
country is depending on him! (He's an airman in the U.S. Air Force)

2) Open When..... You Can't Sleep
In this envelope I included:
-Sleepy Time Tea Packets
-A note saying "Can't Sleep?" and some instructions on what to do.
ex: drink sleepy time tea, count sheep, call me and I'll sing some lullabies

3) Open When.... You Need A Good Laugh
In this envelope I included:
-Silly Pictures of us and friends
-A note which includes extremely corny jokes that will immediately make
anyone laugh due to the stupidity of them.

4) Open When.... You Need A Hug
In this envelope I included:
-A Mailable Hug
DIY: -Trace both hands on construction paper and cut out.
-Measure yarn the length of arm span.
-Connect hands with yarn.
-A note explaining how I made my mailable hug.

5) Open When.... You Are Stressed
In this envelope I included:
-Tazo Focus Tea Packets
-Bubble Wrap
-A note saying "For immediate stress relief, pop bubbles as needed".
As well as an inspirational/motivating sentence.

6) Open When.... You Are Homesick
In this envelope I included:
-CD filled with a bunch of their favorite songs
-A homemade video
DIY: -Film family and friends saying they miss them and hope to see them soon
-Film favorite places, driving to their house, walking up to the front door
(All filmed in the viewers perspective)
-Edit with their favorite songs and funny bloopers
-Create a private YouTube account and upload video
-A note with step by step instructions on how to access the YouTube channel
Write the Username & Password to the YouTube account so they can access
the video as many times as needed when they feel homesick.

7) Open When.... You Need To Hear A Few Compliments
In this envelope I included:
-Take A Compliment rip off sheet
This sheet has compliments written on the bottom, cut & ready for the person to take.
-A note stating some of your favorite qualities in that person

8) Open When.... You Are Horny (If you happen to be a little more than friends with this person)
In this envelope I included:
-Lube
-Risque Pictures
DIY: 1)Print pictures out and put inside envelope
OR
2)Create a private online photo account (can be updated from time to time)
-A note saying a risque message. As well as, the username & password to the online photo
account. (For the recipients eyes only)

These are ideas for "Just Friends- Open When...." Envelopes. There are many more ideas for "Couple- Open When...." Envelopes.
Hopefully some of these ideas inspired you or helped you figure out what to put inside some of your envelopes!!
xoxo,
Christiana
Tuesday, May 19, 2015
Influenster Blossom VoxBox!

During the month of May I received this wonderful surprise, the Blossom VoxBox, at my doorstep from Influenster!
I can not begin to explain how amazing the products are in this box! Lets just get into the reviews!
The first product I tried were the Bear Naked Granola packs. I ate the granola over vanilla Chobani yogurt and let me just say that there was a party in my mouth! I absolutely loved the Salted Caramel Apple granola flavor. I definitely have found a new snack that I am obsessed with!
A 12 oz. bag of Bear Naked Granola costs $10.49. If you want to pick up a pack to try yourself you can order it from the Bear Naked website!
The next product I tried were the Beanitos Black Bean Chips. These chips are delicious and so nutritious for you! I absolutely love black beans but even if you do not like black beans I can bet that you will still like these chips. They definitely do not taste like black beans. They taste very similar to potato chips but are a much healthier option than potato chips!
A bag of Beanitos costs $3.49. If you want to try a bag for yourself you could purchase some from the Beanitos website!
Another food product I received were the Nasoya Pasta Zero Noodles. I created my own recipe to use with these noodles. My whole family tried some for dinner and did not even notice the difference! Let me tell you that my family is very picky with their pasta noodles. I am so happy that they enjoyed them because now we can eat healthier!!
A bag of Nasoya Pasta Zero Noodles costs $2.29. If you want to try some you could buy some from many grocery stores around you! On the Nasoya website they give you a location finder, coupons, and recipes to use with their noodles!
The next product is Sally Hansen Airbrush Legs. I was a little skeptical because I did not want this product to turn me orange but I was pleasantly surprised! I attended a wedding and used this product on my legs. It gave me such a natural tan and many of the guests complimented me on my tan! They thought I went on vacation and got a natural tan. I think I sold some of the guests on this product that night!
A bottle of Sally Hansen Airbrush Legs costs $13.99. You could order this product online through the Sally Hansen website or pick it up at Walmart, Ulta, Kmart, Walgreens, CVS, or Target!
I also tried the Hair Food Root Cleansing Shampoo by Clairol. I just recently got a hair cut and processed my hair. I didn't realize that I would have to put so much product in my hair to maintain my new hairstyle. Since I've been using so much product this root cleansing shampoo really came in handy. My hair felt so heavy and unclean before I used this shampoo. Once I tried it my hair felt lightweight and clean! I definitely and not scared to put product in my hair anymore because now I know I'll be able to get all of it out!
A bottle of Clairol Hair Food Root Cleansing Shampoo costs $9.99. You could pick up a bottle at Target or online through the Target website!
The next product I received was the Australian Gold Sunscreen Lotion SPF 30. This sunscreen smells so good!! I usually do not like the smell of sunscreen but this one smells like a hint of lemon and oranges. I am not sure if they added any of those scents into this sunscreen but for some reason my nose smells citrus! I work with children and am on the playground with them everyday in the hot sun so this sunscreen really has been useful! I love it for everyday use but it is also very water resistant so it is perfect for the pool!
A bottle of Australian Gold Sunscreen SPF 30(8oz) costs $7.99. You could pick up a bottle at Ulta or purchase it from the Australian Gold website!
The last item I tried was the NYC New York Color City Proof 24HR Eye Shadow in the shade Tribeca Taupe. I wanted to really put this product to the test so I decided to wear it to my friends pool party where I knew I would be swimming, be under the hot sun, and be up all night. I also knew I would most likely sleep with my makeup on or just not sleep at all so I would definitely have my makeup on for at least 24 hours. First let me say that the shade Tribeca Taupe is perfect for everyday use. I absolutely love the color and the applicator it comes in. It comes in a pencil so it is very portable and easy to apply and blend. This product also passed my 24HR test! It stayed on me without a smudge for over 24 hours! I was amazed!! I really recommend this product and it is extremely affordable!
One NYC New York Color City Proof 24HR Eye Shadow costs $2.99. You could purchase this at Walmart, CVS, Target, Duane Reade, or on the New York Color website!
Overall the Influenster Blossom VoxBox was an amazing box to receive! I loved every product and I hope you get to try all the products in this box as well. They are definitely worth trying out!
If you want to become an Influenster you can sign up for free through the Influenster website!
Sunday, March 29, 2015
Tuesday, June 3, 2014
Spring Fling Vox Box!

This box contained:
-Kiss Everlasting French Nails
This product is very easy to apply, no chipping, no drying time, and affordable! Don't forget very cute and fashionable!
-Playtex Sport Fresh Balance
This product kept me completely fresh after a very hard workout. It lets me play on during these beautiful spring and summer days!
-Rimmel Scandaleyes Mascara
This mascara has become one of my favorites! It really accentuates your lashes and is very affordable!
-Nivea Skin Firming Lotion
This lotion works wonders! I have only used the lotion for about two weeks now and I already have noticed a difference!
-Labor Day Pie Scented Air Freshener
The Labor Day movie was a great movie. If you have not seen it you need to check it out!
-Softlips Cube
I purchased the Softlips Cube on my own and I love it so much!! It is much better than an EOS lip balm which looks very similar.
I absolutely loved every product in this box!!
If you want to become and Influenster you can create your own profile and start reviewing products that you already love!
Kiss everlasting French Manicure!

I am absolutely loving my no-chip Everlasting French Manicure! I had the privilege to try the Kiss Everlasting French Manicure in my @Influenster Spring Vox Box!
This manicure is so easy to apply. It took me only 10 minutes to complete my whole manicure! No dying time needed!
Also this manicure does not chip and has great lasting power. Plus it is very affordable!
You can find Kiss Nails at any drugstore!
I would recommend Kiss Nails, especially Everlasting French, to anyone who likes to use press on nails or just wants a quicker and more durable self manicure!
Playtext Sport!

I had the opportunity from @influenster to try the new @playtexsportandgentleglide in my Spring Fling Vox Box.
These tampons are very comfortable and easy to use! I can do my hardest work out with my trainer and still be fresh by the end of the workout.
I recommend Playtext Sport to anyone who uses tampons! My Playtext sport fresh balance tampons are definitely helping me play on during these beautiful spring and summer days!!
You can find them at any drugstore, target, or walmart for a very affordable price! If you want to try out a new brand of tampon or need something a little more secure during a workout then you should definitely try Playtex Sport Fresh Balance!
Tuesday, March 4, 2014
How To Tell Skin Undertones!
Knowing your skin undertone is very important when purchasing makeup, specifically foundation. If you are wondering what and undertone is, an undertone is the color that's just beneath the skin. Your
skin tone can change due to sunlight exposure etc., the undertone
does not. Foundations usually come recommended for one of three
undertone types: “cool,” “neutral,” or “warm.” It’s also possible to
fall somewhere in between such as “neutral-warm”.
Finding your skin undertone can sometimes be confusing or hard to figure out but don't worry because all you have to do is look at your veins on your wrist.
 You have a “cool” undertone if:
• If the veins on your wrist are blue or purple
• If silver jewelry flatters your skin more than gold
• When you look at your skin in the sun, it appears blue-ish
• Skin has a pink, red, or blue tinge to it

You have a “neutral” undertone if:
• The veins on your wrist are blue-green
• Both gold and silver jewelry flatter your skin
• When you look at your skin in the sun, it appears greenish
• Skin is neither pink/red/blue nor yellow/gold/peach, but somewhere in between

Now all you need to do is stand outside under natural lighting and look at your veins! Have fun finding your skin undertone and picking out flawless foundation with your new knowledge of your perfect skin undertone!
Finding your skin undertone can sometimes be confusing or hard to figure out but don't worry because all you have to do is look at your veins on your wrist.
• If the veins on your wrist are blue or purple
• If silver jewelry flatters your skin more than gold
• When you look at your skin in the sun, it appears blue-ish
• Skin has a pink, red, or blue tinge to it
You have a “neutral” undertone if:
• The veins on your wrist are blue-green
• Both gold and silver jewelry flatter your skin
• When you look at your skin in the sun, it appears greenish
• Skin is neither pink/red/blue nor yellow/gold/peach, but somewhere in between
You have a “warm” undertone if:
• The veins on your wrist are slightly green or olive
• Gold jewelry flatters your skin more than silver
• When you look at your skin in the sun, it appears yellowish
• Gold jewelry flatters your skin more than silver
• When you look at your skin in the sun, it appears yellowish
• Notice their skin has a yellow, gold, or peach tinge to it.
Now all you need to do is stand outside under natural lighting and look at your veins! Have fun finding your skin undertone and picking out flawless foundation with your new knowledge of your perfect skin undertone!
Monday, March 3, 2014
Sunday, January 5, 2014
The Luxor Hotel in Las Vegas Nevada!

I walked into every hotel on the strip and the Luxor had the best
ambiance out of all the hotels. The one and only thing I disliked about
the hotel was the smell. It smelled like coconuts and cigarettes. I
personally really dislike the smell of both of those things. All in all I
absolutely adored this hotel so I am able to over look the smell. I
felt comfortable walking around gambling and making friends. The staff
members are very friendly and extremely accommodating. The first night I
had tickets to see a show and I got sick right before the show and had
to miss it. The staff was able to switch my tickets to the next night so
I did not lose my money!
 LAX night club is located right by the gambling floor and walking
distance to your hotel room. Many people promote the club before it
opens so most likely you will be able to get a wrist band to enter for
free. Also girls drink free from 10:30pm to 12pm. LAX does close at 2am.
The attire for LAX is not strict at all. You just need to look somewhat
decent and they will let you in. I thought you had to wear heels but if
you wear fancy flats they do not mind. Also if you drink a little too
much then leaving the club is perfect because your hotel room is right
outside the door.
LAX night club is located right by the gambling floor and walking
distance to your hotel room. Many people promote the club before it
opens so most likely you will be able to get a wrist band to enter for
free. Also girls drink free from 10:30pm to 12pm. LAX does close at 2am.
The attire for LAX is not strict at all. You just need to look somewhat
decent and they will let you in. I thought you had to wear heels but if
you wear fancy flats they do not mind. Also if you drink a little too
much then leaving the club is perfect because your hotel room is right
outside the door. 
 The hotel rooms are very spacious and extremely clean! The bathrooms are
beautiful and the shampoo, soap, and lotion smell amazing. The view
from the window is wonderful but be careful not to hit your head because
the window is tilted since you are in a pyramid! This hotel is in
walking distance to the famous 'Welcome to Vegas' sign but is at the end
of the strip. Make sure to bring sneakers if you want to walk and do not
want to take a taxi to other locations.I walked the entire strip which
was amazing so it is definitely doable!
The hotel rooms are very spacious and extremely clean! The bathrooms are
beautiful and the shampoo, soap, and lotion smell amazing. The view
from the window is wonderful but be careful not to hit your head because
the window is tilted since you are in a pyramid! This hotel is in
walking distance to the famous 'Welcome to Vegas' sign but is at the end
of the strip. Make sure to bring sneakers if you want to walk and do not
want to take a taxi to other locations.I walked the entire strip which
was amazing so it is definitely doable!
There are many shows located right in the Luxor hotel as well. The shows within the Luxor are the Criss Angel Believe show, the Jabbawockeez Prism show, the Fantasy strip show, Menopause the Musical, the Bodies exhibit, and the Titanic Artifact exhibition. There usually are bundles at the ticket counter where you can save money and see multiple shows. The shows presented in the Excalibur are the Thunder From Down Under strip show, Tournament of Kings dinner show, and the Austrailian Bee Gees. The shows presented at Mandalay Bay are the Michael Jackson One Cirque Du Soleil show, the Shark Reef, and the Beach Concert Series.

My most recommended show everyone should go see is the Jabbawockeez Prism show. The dancing is amazing and the show is very comical. Even though the dancers do not speak once you will be laughing the whole time. It is an amazing show. The next show I would recommend any woman seeing is the Thunder From Down Under strip show. This show is very well put together with dance routines and is very interactive with the audience. Every dancer is Australian and absolutely wonderful. At the end of the show you have the option to take a photo with them!

As you can see I had the best time at Thunder From Down Under (I am on the right side of the photo)


Monday, December 23, 2013
Influenster #JollyVoxBox!

Rimmel London Show Off Lip Lacquer
NYC HD Color Trio
Mini Ducklings Duck Tape
Puffs Plus Lotion Tissues
Skinny Cow Divine Filled Chocolate Candies
Each product in this box works great for what they are used for. I am very grateful to have been able to try out all these products. If you are interested in finding out more information about each product you can do so by clicking the links provided above. If you want to become an influenster you can click on the provided link to find out more information as well!!

Sunday, October 27, 2013
NYC New York Color Big Bold Gloss!

If you want to learn more about this product please visit http://www.influenster.com/review/nyc-new-york-color-big-bold-plumping-shine-lip-gloss or http://newyorkcolor.com/
I hope you give NYC New York Color Big Bold Gloss a chance! It is definitely worth the try!
Monday, June 3, 2013
Schwarzkopf Professional OSiS+ Rough Rubber Gel!

When I put this Schwarzkopf Professional OSiS+ Rough Rubber Gel into my hair it held my hair so well! I have little baby hairs that frame my face and they tamed them all day long.
Also it helped keep the frizz away! I absolutely love this product! Women and men can both use this product.
OSiS+ Rough Rubber is a paste with an innovative rubber consistency that separates and defines, while leaving a subtle matte finish. Perfect for creating a piecey and separated look. You can find it for $20.00 at salons across America, and Ulta.com. If you shop wisely there is almost always a coupon you can use at Ulta stores and online!
If you want to learn more about Schwarzkopf Professional OSiS+ Rough Rubber Gel and their other products you can visit their website: http://www.schwarzkopf-professionalusa.com/
Secret Outlast Clear Gel!

Secret is my favorite deodorant brand. Before I had the chance to purchase it on my own I received the Secret Outlast Clear Gel in my Spring Vox Box from Influenster! It was an amazing surprise.
When I tried this product out I was in shock. It protected me from odor, wetness, and white marks!! Yes it has all three most important aspects of a deodorant!
If you want to learn more about Secret Outlast Clear Gel you can visit their website www.secret.com
If you try Secret Outlast Clear Gel you will never have to do one of these dances again: http://www.youtube.com/watch?v=W32RHWByrGY
Broadway Nails imPRESS Press-on Manicure!

If you want to learn more about imPRESS Press on nails you can visit their website at: http://impressmanicure.com/
Through their website there also is a $1.00 off coupon you can print to use on your next purchase!
You can also receive 50% off of imPRESS nails plus free shipping if you purchase them through BeautySupplyOnline.com with the code: AVONBOX50
They are super affordable as well. $5.99 for colors $7.99 for patterns at CVS, CVS, Rite Aid, Duane Reade, KMart, Walgreens, Walmart, and more!
These nails are definitely worth a try!
Friday, May 24, 2013
Tastykake® Kandy Bar Kakes!

The moment I took one bite I was in heaven!! It was so delicious! These Kandy Bar Kakes come in three different flavors. Peppermint, S'mores, and Peanut Butter. They are sold individually for $1.69 or a family pack for $4.49.
If you want to learn more information and where you can purchase these delicious treats then you can through these two links:
http://www.influenster.com/review/tastykake-kandy-bar-kakes
http://www.tastykake.com/
If you decide to try them out I know you will not be disappointed!!
Subscribe to:
Posts (Atom)

