Monday, December 14, 2015

DIY: Long Distance Mug!

Here are step by step instructions on how to create this adorable mug for a long distance best friend! You can always change around the wording if you are in a long distance relationship!


 Step 1) Purchase supplies
                   -1 White Mug (I bought mine at the dollar store)
                   -Paint Pens in any color needed (available at craft stores)
                   -Scissor
                   -Tape
                   -Pencil


Step 2) Print out the outline of both states you are including on the mug.
             Make sure you tape the states on the mug to test out the size before you start tracing.

Step 3) Shade in the entire back of the state (side of paper that is white) with pencil.
             This step allows for the pencil to be transferred onto the mug when you trace the state.

Step 4) Tape the picture of the state onto your mug. Trace the state with your pencil.
             Peel off when you are done fully tracing the state.


Step 5) With your paint pen, draw over the pencil transfer marks.
             Be careful not to touch the paint- let dry for 30 mintues

Step 6) Repeat for second state

Step 7) With pencil, draw dashed lines connecting both states to the cities you each are located in.

Step 8) Draw over the pencil dashed lines with your paint pen.
            Add tiny red hearts, with paint pen, locating the cities you both are located in each state. 
            Allow that side of the mug to dry for 30 minutes before holding the mug.

Step 9) Once the front side of the mug is dry, turn the mug to the back side.
             Trace any quote you want to put on the mug out in pencil.

Step 10) Go over the quote written in pencil with your paint pen.

Step 11) Allow the entire mug to dry over night.

Step 12) Put mug into oven at 425 Degrees for 30 minutes.
              Heating the mug makes the paint solidify into the mug.
              Place mug into cold oven while heating up so the mug acclimates with the temperature
              slowly and does not crack.
              When the 30 minutes are up, leave the mug in the oven while the oven cools down.
              These steps are precautionary so the mug does not crack.


Now you're all finished!! You have just made a thoughtful and extremely cute gift for a long distance friend or long distance boyfriend/girlfriend!!
xoxo,
Christiana

DIY: Christmas Care Box!

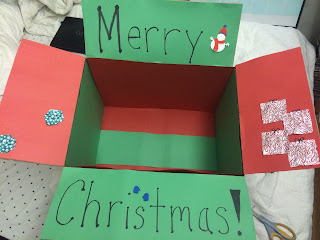
This Christmas I decided to send a Christmas Care Box, filled with goodies, to my best friend who is in the Air Force.

Here are step by step directions on how to decorate the inside of a plain mailing box!

Step 1) Pick up a free box from the post office
                                  OR
             Purchase the appropriate size box to fit all your presents

I had to purchase the box I used since the gifts I was sending did not fit in the free boxes from the post office. Make sure you measure the largest item you are sending before you go to the store to purchase your box. The store employee will want to know the dimension of the box you want. Knowing the size of the largest item you will be sending will make it much easier to find a box.

Step 2)  Pick up craft supplies
                  -Scissors
                  -Tape
                  -Glue
                  -Black Sharpie or Colored Markers
                  -Decorative Paper
                  -Stickers, Glitter, Festive Items
                  -Any craft item that you think will enhance the look of your box

Step 3) Print out any pictures that you would like to add on your box. Cut them out.

Step 4) Measure decorative paper to the size of the sides of your box. Cut paper to size and tape.
            Any cardboard area which is shown inside your box will be covered with decorative paper.
            Make sure the paper is securely taped down. You do not want any of the paper to peel off
            during the mailing process of your care box.

I decorated my box with red and green paper. Alternating the colors.

Step 5) Write any message on the tabs of your box with a sharpie or colored markers.
             Decorate with festive decorations! (I used a little snow man and foil from Holiday
             Hershey Kisses. I made them into little snowflakes and presents)
             Make sure you tape/glue down all decorations securely!


Step 6) Glue on pictures to the tabs of your box and sign your name.


Step 7) Fill box with gifts and goodies!


Now you're all done!!!! You have made a very festive and thoughtful care box! It is very simple and is a lot of fun to put together! There are many creative quotes to write inside care boxes if you are in a long distance relationship. If you can't come up with a personal/unique quote then I recommend looking up care boxes on pinterest or google!
xoxo,
Christiana


Sunday, December 13, 2015

DIY: Open When... Envelopes!

This Christmas I decided to send a Christmas Care Box to my best friend in the Air Force. Within the care box I included a few "Open When....." envelopes.

Here are some "Open When..." envelope ideas, as well as what to put inside.

Include an envelope which states "Open When.... You Get This Package!"
        In this envelope I included:
               -A note saying "Merry Christmas", hopes he enjoys his gifts, and how the envelopes work

1) Open When..... You Feel Sick
         In this envelope I included:
               -Cough Drops
               -Tea Packets
               -Tissues
               -A note saying "Cold Care Kit", what is inside, and to feel better quickly since our
               country is depending on him! (He's an airman in the U.S. Air Force)


2) Open When..... You Can't Sleep
           In this envelope I included:
               -Sleepy Time Tea Packets
               -A note saying "Can't Sleep?" and some instructions on what to do.
                     ex: drink sleepy time tea, count sheep, call me and I'll sing some lullabies 


3) Open When.... You Need A Good Laugh
                         In this envelope I included:
                                  -Silly Pictures of us and friends
                                  -A note which includes extremely corny jokes that will immediately make
                                  anyone laugh due to the stupidity of them.


4) Open When.... You Need A Hug
              In this envelope I included:
                    -A Mailable Hug
                              DIY: -Trace both hands on construction paper and cut out. 
                                       -Measure yarn the length of arm span.
                                       -Connect hands with yarn.
                    -A note explaining how I made my mailable hug.


5) Open When.... You Are Stressed
             In this envelope I included:
                -Tazo Focus Tea Packets
                -Bubble Wrap
                -A note saying "For immediate stress relief, pop bubbles as needed".
                 As well as an inspirational/motivating sentence.


6) Open When.... You Are Homesick
                In this envelope I included:
                            -CD filled with a bunch of their favorite songs
                            -A homemade video
                                 DIY: -Film family and friends saying they miss them and hope to see them soon
                                          -Film favorite places, driving to their house, walking up to the front door
                                          (All filmed in the viewers perspective)
                                          -Edit with their favorite songs and funny bloopers
                                          -Create a private YouTube account and upload video
                            -A note with step by step instructions on how to access the YouTube channel
                             Write the Username & Password to the YouTube account so they can access
                              the video as many times as needed when they feel homesick.


7) Open When.... You Need To Hear A Few Compliments
               In this envelope I included:
                        -Take A Compliment rip off sheet
                          This sheet has compliments written on the bottom, cut & ready for the person to take.
                        -A note stating some of your favorite qualities in that person


8) Open When.... You Are Horny        (If you happen to be a little more than friends with this person)
         In this envelope I included:
               -Lube
               -Risque Pictures
                        DIY: 1)Print pictures out and put inside envelope
                                                           OR
                                 2)Create a private online photo account (can be updated from time to time)
               -A note saying a risque message. As well as, the username & password to the online photo
                account. (For the recipients eyes only)


These are ideas for "Just Friends- Open When...." Envelopes. There are many more ideas for "Couple- Open When...." Envelopes.
Hopefully some of these ideas inspired you or helped you figure out what to put inside some of your envelopes!!


xoxo,
Christiana

Tuesday, May 19, 2015

Influenster Blossom VoxBox!


During the month of May I received this wonderful surprise, the Blossom VoxBox, at my doorstep from Influenster!

I can not begin to explain how amazing the products are in this box! Lets just get into the reviews!

The first product I tried were the Bear Naked Granola packs. I ate the granola over vanilla Chobani yogurt and let me just say that there was a party in my mouth! I absolutely loved the Salted Caramel Apple granola flavor. I definitely have found a new snack that I am obsessed with!

A 12 oz. bag of Bear Naked Granola costs $10.49. If you want to pick up a pack to try yourself you can order it from the Bear Naked website!

The next product I tried were the Beanitos Black Bean Chips. These chips are delicious and so nutritious for you! I absolutely love black beans but even if you do not like black beans I can bet that you will still like these chips. They definitely do not taste like black beans. They taste very similar to potato chips but are a much healthier option than potato chips!

A bag of Beanitos costs $3.49. If you want to try a bag for yourself you could purchase some from the Beanitos website!

Another food product I received were the Nasoya Pasta Zero Noodles. I created my own recipe to use with these noodles. My whole family tried some for dinner and did not even notice the difference! Let me tell you that my family is very picky with their pasta noodles. I am so happy that they enjoyed them because now we can eat healthier!!

A bag of Nasoya Pasta Zero Noodles costs $2.29. If you want to try some you could buy some from many grocery stores around you! On the Nasoya website they give you a location finder, coupons, and recipes to use with their noodles!

The next product is Sally Hansen Airbrush Legs. I was a little skeptical because I did not want this product to turn me orange but I was pleasantly surprised! I attended a wedding and used this product on my legs. It gave me such a natural tan and many of the guests complimented me on my tan! They thought I went on vacation and got a natural tan. I think I sold some of the guests on this product that night!

A bottle of Sally Hansen Airbrush Legs costs $13.99. You could order this product online through the Sally Hansen website or pick it up at Walmart, Ulta, Kmart, Walgreens, CVS, or Target!

I also tried the Hair Food Root Cleansing Shampoo by Clairol. I just recently got a hair cut and processed my hair. I didn't realize that I would have to put so much product in my hair to maintain my new hairstyle. Since I've been using so much product this root cleansing shampoo really came in handy. My hair felt so heavy and unclean before I used this shampoo. Once I tried it my hair felt lightweight and clean! I definitely and not scared to put product in my hair anymore because now I know I'll be able to get all of it out!

A bottle of Clairol Hair Food Root Cleansing Shampoo costs $9.99. You could pick up a bottle at Target or online through the Target website!

The next product I received was the Australian Gold Sunscreen Lotion SPF 30. This sunscreen smells so good!! I usually do not like the smell of sunscreen but this one smells like a hint of lemon and oranges. I am not sure if they added any of those scents into this sunscreen but for some reason my nose smells citrus! I work with children and am on the playground with them everyday in the hot sun so this sunscreen really has been useful! I love it for everyday use but it is also very water resistant so it is perfect for the pool!

A bottle of Australian Gold Sunscreen SPF 30(8oz) costs $7.99. You could pick up a bottle at Ulta or purchase it from the Australian Gold website!

The last item I tried was the NYC New York Color City Proof 24HR Eye Shadow in the shade Tribeca Taupe. I wanted to really put this product to the test so I decided to wear it to my friends pool party where I knew I would be swimming, be under the hot sun, and be up all night. I also knew I would most likely sleep with my makeup on or just not sleep at all so I would definitely have my makeup on for at least 24 hours. First let me say that the shade Tribeca Taupe is perfect for everyday use. I absolutely love the color and the applicator it comes in. It comes in a pencil so it is very portable and easy to apply and blend. This product also passed my 24HR test! It stayed on me without a smudge for over 24 hours! I was amazed!! I really recommend this product and it is extremely affordable!

One NYC New York  Color City Proof 24HR Eye Shadow costs $2.99. You could purchase this at Walmart, CVS, Target, Duane Reade, or on the New York Color website!

Overall the Influenster Blossom VoxBox was an amazing box to receive! I loved every product and I hope you get to try all the products in this box as well. They are definitely worth trying out!

If you want to become an Influenster you can sign up for free through the Influenster website!